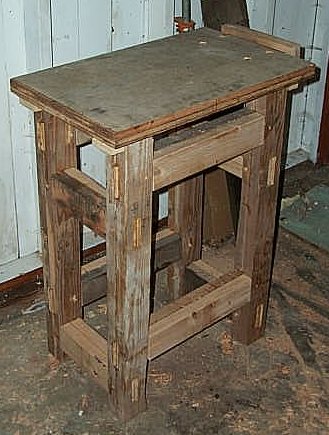
So, taking a clue from the software world, I built a prototype. I figured I needed a dedicated sharpening station at which to keep my water stones and lapping plates and my hand-crank grinder. So, I used the same methods to build this mini bench as I would use to build my real bench. Mostly.
In retrospect, I should have dived right in to making the real bench. It might not have turned out quite as nicely as it finally did, but I would have had it a lot sooner. None of my screwups were fatal, and all the skills needed to build the bench are used repeatedly just to build the bench, so there still would have been enough opportunity to learn by doing.
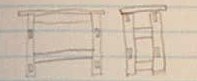
Here's my detailed schematic:
I did everything with direct measurement (no units, just transferring dimensions from part to part.), so the lack of detail wasn't too much of a problem.
I made the prototype out of scrap construction 2x4s that were floating around the garage. I didn't surface them in any way before laminating them into something vaguely resembling 4x4s (well, I did sweep most of the dirt off). Amazingly this doesn't seem to have mattered.
I cut all the boards to length with a 1940s Disston cross
cut that was left in a drawer by the former owner of my
 house. the mortises were drilled with a 1-inch auger in my
12-inch brace. I learned half-way through the project that
this process went much more smoothly if I drilled only
half-way through from one side before drilling the other
half from the other side. Since finishing the prototype
I've acquired a nice Stanley bit gage/depth stop from Sandy
Moss to help with this method. I chiseled out the waste
with my 1" Marples blue
chip. I think
this would go much more easily with a corner chisel. For
the tenons, I started the rip cuts with my Disston dovetail
saw (only rip-cut backsaw I've got so far), then finished
them off with my full-size Shurly rip saw. I did the
shoulder cuts with my cheap new gent's saw. I plan to put
more care into the accuracy of the shoulder cuts for the
real bench as BugBear has clued me in to why shoulders are
so important. (solid lock of the shoulders with the legs
reduces stress on the glue joint in the mortise). Since my
house. the mortises were drilled with a 1-inch auger in my
12-inch brace. I learned half-way through the project that
this process went much more smoothly if I drilled only
half-way through from one side before drilling the other
half from the other side. Since finishing the prototype
I've acquired a nice Stanley bit gage/depth stop from Sandy
Moss to help with this method. I chiseled out the waste
with my 1" Marples blue
chip. I think
this would go much more easily with a corner chisel. For
the tenons, I started the rip cuts with my Disston dovetail
saw (only rip-cut backsaw I've got so far), then finished
them off with my full-size Shurly rip saw. I did the
shoulder cuts with my cheap new gent's saw. I plan to put
more care into the accuracy of the shoulder cuts for the
real bench as BugBear has clued me in to why shoulders are
so important. (solid lock of the shoulders with the legs
reduces stress on the glue joint in the mortise). Since my
 tenon cheek cuts never fit their mortises the first time I
used that same 1-inch chisel to pare them down. Later in
the game I started using my newly tuned #78 steel rabbet
plane with the depth stop and fence removed to do this, and
that worked pretty well. Since even after the trimming the
fit was kind of iffy on some of the tenons, I decided to peg
the joints when gluing the base up. I had some 3/8-inch
dowels around, and with a regular 3/8" drill bit (my 6/16
auger bit drilled holes too big for my dowels) chucked in my
8-inch brace, the holes were drilled in short order. I
drilled the corresponding holes in the tenons slightly
offset towards the shoulders to help draw the joint together
and then it was time to bite the bullet and spread some
glue. I was kind of nervous about that part of the project,
but once I figured out that you had to tap vs. pound the
pegs into the holes, everything went together fine (light
taps let the holes wiggle into alignment, huge whacks just
pulverized the dowel when it was only a third of the way
through the joint.)
I glued the two end assemblies together first, and then
glued the stretchers between them the next day. One of the
advantages of the pegged tenons is that no clamps are needed
while the glue dries. One less thing to juggle at assembly
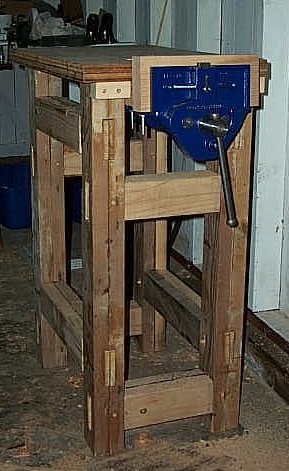
time. I decided at about this point that if I was going to
make this a prototype I should go all the way and mount my
vice on it as well. I hadn't planned for this up front, but
through dumb luck, my huge Record 52 woodworking vice that I
bought two years ago just fit between the legs of the side
assembly, and the top is long enough to accomodate the
tenon cheek cuts never fit their mortises the first time I
used that same 1-inch chisel to pare them down. Later in
the game I started using my newly tuned #78 steel rabbet
plane with the depth stop and fence removed to do this, and
that worked pretty well. Since even after the trimming the
fit was kind of iffy on some of the tenons, I decided to peg
the joints when gluing the base up. I had some 3/8-inch
dowels around, and with a regular 3/8" drill bit (my 6/16
auger bit drilled holes too big for my dowels) chucked in my
8-inch brace, the holes were drilled in short order. I
drilled the corresponding holes in the tenons slightly
offset towards the shoulders to help draw the joint together
and then it was time to bite the bullet and spread some
glue. I was kind of nervous about that part of the project,
but once I figured out that you had to tap vs. pound the
pegs into the holes, everything went together fine (light
taps let the holes wiggle into alignment, huge whacks just
pulverized the dowel when it was only a third of the way
through the joint.)
I glued the two end assemblies together first, and then
glued the stretchers between them the next day. One of the
advantages of the pegged tenons is that no clamps are needed
while the glue dries. One less thing to juggle at assembly
time. I decided at about this point that if I was going to
make this a prototype I should go all the way and mount my
vice on it as well. I hadn't planned for this up front, but
through dumb luck, my huge Record 52 woodworking vice that I
bought two years ago just fit between the legs of the side
assembly, and the top is long enough to accomodate the
 length of the vice. I thought that mounting the vice would
be more complicated, but after scrounging the scrap pile for
some boards of the appropriate thickness it went fine. I
chose to have the vice face out-board from the edge of the
top. With a top only 1-1/2-inches thick it didn't make
sense to inlay it into the
edge
of the top. I also opted for through bolts rather than lag
bolts since I didn't figure the thickness of the top would
accomodate lags. With the vice mounted, I just had to make
some screw blocks to hold the top onto the base. I used the
vice to hold the 2x4 that I ripped into a 2x2 for the
purpose, and wow, this is a lot better than sawhorses and
jorgensons! cut the blocks, drilled holes and counter
sinks, bought some screws, and screwed everything together
and it's done! Not a single electron died in the production
of this protobench. Not even for lights. (Though my
solar/dynamo radio did consume a few, but does that
count?)
length of the vice. I thought that mounting the vice would
be more complicated, but after scrounging the scrap pile for
some boards of the appropriate thickness it went fine. I
chose to have the vice face out-board from the edge of the
top. With a top only 1-1/2-inches thick it didn't make
sense to inlay it into the
edge
of the top. I also opted for through bolts rather than lag
bolts since I didn't figure the thickness of the top would
accomodate lags. With the vice mounted, I just had to make
some screw blocks to hold the top onto the base. I used the
vice to hold the 2x4 that I ripped into a 2x2 for the
purpose, and wow, this is a lot better than sawhorses and
jorgensons! cut the blocks, drilled holes and counter
sinks, bought some screws, and screwed everything together
and it's done! Not a single electron died in the production
of this protobench. Not even for lights. (Though my
solar/dynamo radio did consume a few, but does that
count?)
Here's the bench I used to build the protobench:
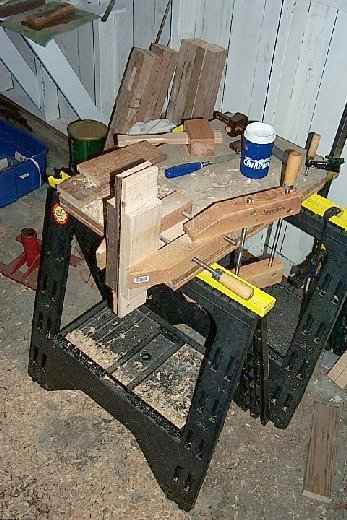
It's a couple of plastic folding sawhorses with a couple of pieces of 3/4" plywood (the future top of the protobench) clamped to them. The "vise" is a couple of 12" Jorgenson hand screws. It worked amazingly well for how pitiful it was.
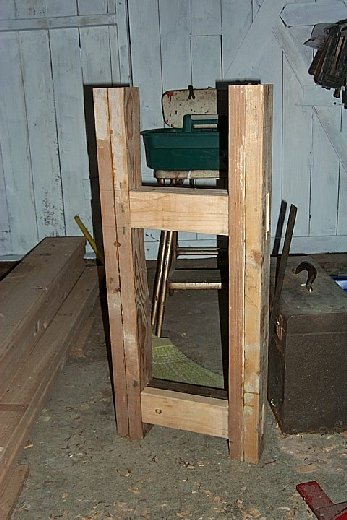
In the photo above you can see the legs for the protobench leaning up against the wall (you can even see one of the mortises). One of the side rails is in the "vise". I made this out of scrap 2x4 lumber that was lying around, so the two-tone look of the rail is a consequence of that as opposed to being some avant garde design decision.
 Here's a picture of the first leg assembly. It's ugly, but
it stands on its own and is pretty square. The biggest
screwup I had on this part was laying out one of the
mortises off the wrong face of the leg. I was able to cut
the tenon for that one offset on its stretcher so it still
went together square. If this was ever going to leave my
shop I probably would have made a new leg, but it works for
its intended purpose.
Here's a picture of the first leg assembly. It's ugly, but
it stands on its own and is pretty square. The biggest
screwup I had on this part was laying out one of the
mortises off the wrong face of the leg. I was able to cut
the tenon for that one offset on its stretcher so it still
went together square. If this was ever going to leave my
shop I probably would have made a new leg, but it works for
its intended purpose.
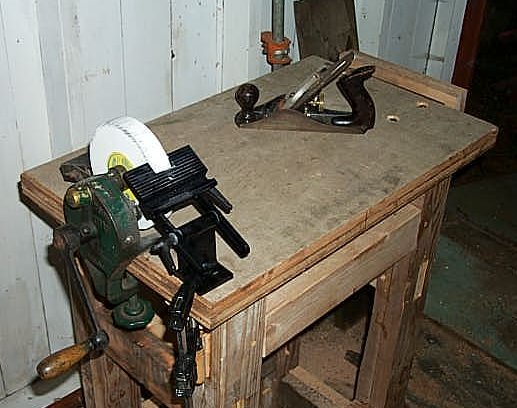
The prototype approach worked really well as I made lots of mistakes and learned lots of things. Things like how to saw to a line, and how to drill a hole straight through a board. Little things like that.
This page last updated 1/9/2002
TomeCat | Home |
Woodworking | Bench | Contact Webmaster