I'll put off the revamp of last week's pitiful quoting quagmire
until inspiration strikes.
There are several tools available to reduce the amount
of paper you use when you print stuff out.
First off, all the qmX printers can print double sided on
8.5x11 inch paper. To use the double-sided feature, just
send your printout to qmX-duplex instead of just qmX.
- a2ps(1)
- This tool takes any text file and transforms it into postscript
This is the brains behind the faganprint script if you've
ever used that. Default behavior is to print two pages side by side
with borders and headers showing when the printout was done, what
the filename was, and other debatably useful information. Here's
sorta what it looks like:
% a2ps .login > foo.ps
[.login: 2 pages on 1 sheet]
[Total: 2 pages on 1 sheet]
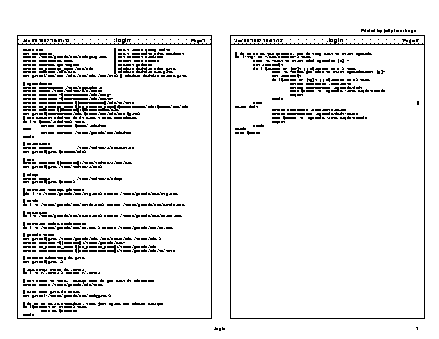
- Frame
- Framemaker lets you print what it calls "thumbnails"
which is fancy professional printer words for n-up. To
enable this, in the "print" dialog, turn on the little
thumbnails checkbox, and then enter the number of rows
and columns of logical pages you would like on each
page of paper (1 row and 2 columns does something
similar to a2ps). The dialog looks kinda like this:
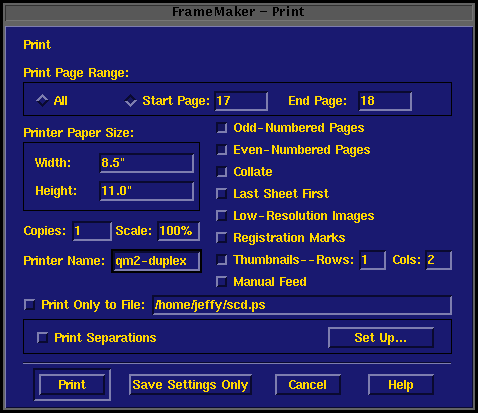
Yours is probably a different color. Notice that I
also took advantage of the fact that I can restrict the
list of pages I want to print, and I'm printing to qm2-duplex
to get double sided in addition to 2-up. Here's what that
printout looked like:
Notice that Frame doesn't have enough sense to re-orient
the landscape page to take advantage of as much of the
paper as possible, so it shrinks the landscape one to
fit in a portrait-sized space. To get around this you
can switch to doing 2 rows and 1 column, and then the
portrait pages get shrunk to fit into a landscape
sized space, but the landscape pages come out full size.
Kinda lame either way.
- mpage(1)
- mpage works on both regular text files
and on postscript files. Its default behavior is to
print four logical pages per physical page with lines
around the pages. Four-up is actually fairly readable for
plain text files. It will also do 2-up (via the
"-2" option), 8-up ("-8", good if you
don't mind using a magnifying glass. Great for
documentation of unknown usefulness, you can get 16 page on
one sheet of paper, and if it turns out to be useless you
don't have to feel too guilty when you chuck it in
the recycling bin.) and 1-up ("-1", not real
useful).
Some of mpage's other defaults aren't real
intuitive, so I set the MPAGE environment variable to
override them:
% printenv MPAGE
-aP
The "-a" causes successive pages to be placed
across the physical page (in rows), rather than the default
of down the page (in columns). The "-P" forces the
output to go to stdout rather than directly to the printer.
I strongly recommend that you at least use the "-P"
flag so that mpage's output can be redirected to a
file for further examination before printing. The "-a"
is more a matter of taste.
mpage solves the problem of getting useful n-up
printouts from Frame. First print the pages you want from
your frame document without using thumbnails, but print them
out to a postscript file using the "Print Only to File:" option
in the Frame print dialog. Once you have the postscript
file, you can run mpage on that to generate a new
postscript file with the multiple pages per sheet.
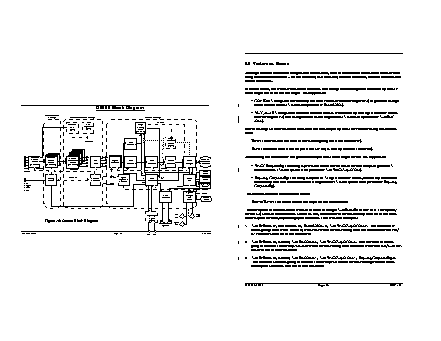
Here's that chunk from the SCD again (plus a couple more pages)
as spit out by the following command:
% mpage scd.ps > foo.ps
[mpage: 1 pages, on <stdout>]

- ghostview(1)
- While you're playing around with your command of choice,
it makes sense to take a look at the postscript output
before you send it off to the printer to be laboriously
transcribed in carbon on wood pulp, so get in the habit of
doing your postscriptification into a file, then examining
the file using ghostview to make sure it looks
mostly like you'd expect. I wouldn't encourage anyone to
try to actually read anything using ghostview,
but I've heard of people doing it. All the paper pictures in
this tip are snapshots of the ghostview screen (shrunk down
tiny. At the default size it is basically readable).
Once you're convinced
you're generating postscript that achieves the effect you're
going for, send it to the printer with lpr:
% mpage -8 lamedoc.ps > foo.ps
[mpage: 4 pages, on <stdout>]
% ghostview foo.ps
% lpr -Pqm2-duplex foo.ps
% rm foo.ps
That put up to 32 pages of (probably useless) stuff onto
only two sheets of paper.
Your friendly local tree thanks you.