I finally built my version of Bob and Dave Key's Good, Fast, Cheap Bench. (update 11/30/05. link now points to archive.org since the Key's have let their domain registration lapse :-( no pictures)
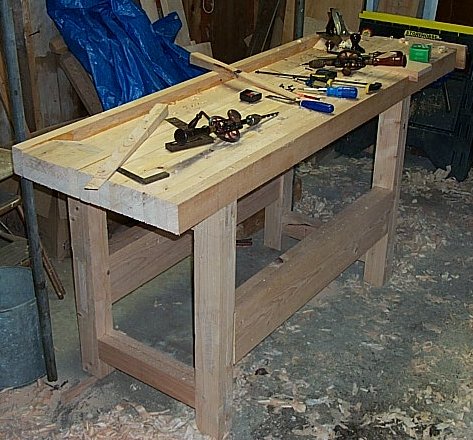
Here's a picture of it in use for the first project after its completion. (I'm obviously not used to using a tool tray yet ;-)
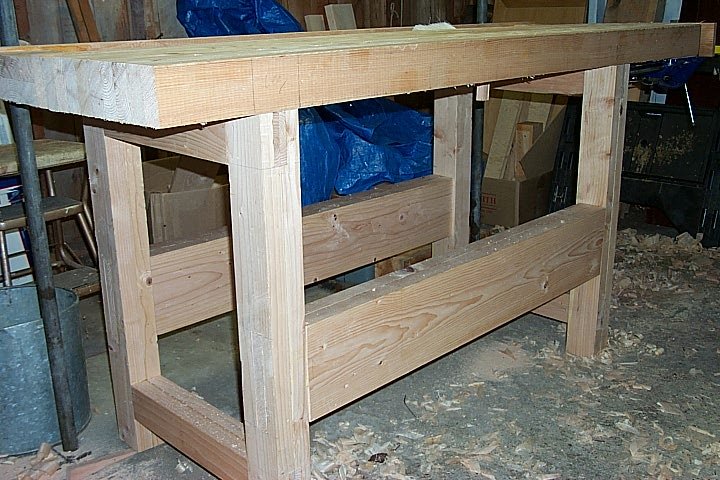
And here's a picture showing a closer view of the base.
I started work on the bench on September 22nd, 2001 and finished it to the point shown in the pictures on December 30th, 2001. I actually did some work on it on 22 days in that period, with a maximum of maybe 7 hours on any one day. Most days I spent under 2 hours. I didn't keep track of the number of hours, but I'd estimate somewhere between 60 and 80 hours total.
I spent about $70 for the wood at the local home center. The vice was the most expensive part at about $125. So under $200 total material cost. See the Hindsight section below for a hint on how to reduce that further.
I built the bench entirely using hand tools. No electricity was used in this project.
I can't express how much better this is to work on than the sawhorses and plywood I started out with, or even the little prototype I built with them. I've got a page about the sad excuses for benches I used on my way to this latest incarnation.
I'm a pretty big galoot, and this thing does not move at all when I plane down it unlike all the other bench-like devices I've used so far. The tail vice and dog holes are just insanely useful for surface planing, but even just a dog by itself on this big immovable platform is worlds better than anything that dances around the room.
A couple of people have asked me how I made the dog, so I've added a page about that

About a month after I finished the bench, I put together a leg vise as my front/face vise. I modelled it after one Bob Key has on his website . The hardware is a tail vise screw from Lee Valley which is waaaay longer than it really needs to be for this application. The vice jaw is a hemlock 2x8 left over from the bench stretchers. The screw collar had to be mounted a little farther down from the top of the bench than I would have liked, but the bench design doesn't allow any other placement, and it seems to work fine. I drilled the hole through the leg and the vice jaw with a brace and an irwin expansive bit I got at a yard sale for a buck. It tended to catch fibers from this soft hemlock and stop cutting, but cut well enough if I cleared it once in a while. I made the front legs flush with the edge of the bench because I was thinking that I needed to for the leg vise to work, but since the jaw of the vise only addresses the top of the bench, it really didn't matter. Though it will allow me to drill holes in the opposite leg for pegs or a holdfast to easily act as a board jack for jointing long boards. For the foot of the vise, I thought about mortising something through the foot of the leg or coming up with something that could be adjusted, but finally decided to try this simple solution. I can always complicate it later. That's just galvanized strap from the hardware store that I put a bend in and attached to the back of the vice jaw with a couple of wood screws (there's another one on the opposite side of the leg). This part is only ever in compression, and even then, only takes a fraction of the stress that the working end of the jaws do, so it doesn't have to be too beefy. I'm using a lag bolt with a nut for the pin across the two metal arms. It just takes a second to squat down and move it to another set of holes when I need to change the vice opening.
It didn't take more than a couple of hours to put the whole vise together including a trip to the hardware store for the straps. And darned if the thing doesn't work pretty good. I clamped a 2x4 in there and could tip up the rest of the bench without it budging in the vise.
The bench is made completely from construction grade 2x4 and 2x8 lumber.
I made my first bench dog before starting the top so I would know how big to make my dog holes.
With dog in hand, I laid out the dog holes about 6 inches apart on one of the top boards. Marked them with my sliding bevel set to a few degrees toward the vice end. Sawed the front and back sides of the dog holes and chiseled out the waste. Cleaned up the bottom (side) of the hole with my router plane.
With the dog strip made, I glued up the rest of the top. I didn't do any surface prep of the 2x4s before gluing them together except to plane down the occasional high spot. There's so much glue surface here that as long as there aren't gaping holes, it should hold together okay. Remember, this is the good FAST cheap bench, not the heirloom museum piece. Just get it done was my motto. I only glued on a couple of boards at a time as Bob and Dave suggest, and that worked well.
Once the top was done, I plunked it on a couple of sawhorses, mounted the vice, and had a half-way decent place to work on the base.
The base joinery is all through mortises with tenons the full width of the members. I drilled the mortises out with a brace and bit, then pared them square with a 1" Marples blue handle chisel. I got pretty good at it by the last one. The tenons were cut using a mix of not-deep-enough back saws and regular panel saws in both rip and crosscut followed by a bit of trimming with a steel rabbet plane with the depth stop and fence removed (poor man's shoulder plane).
The top joints of the two ends of the base could be simpler bridle joints, but I hadn't decided how I was going to attach the top to the base, so I made them regular mortises. I had heard that a leg vise has a tendency to push the top off the base if it's not well attached (Thanks Bretton!), so I wanted to do something to address that issue. I thought about bringing all four of the legs up through the top, but I was afraid that constraining the width of the top like that would cause problems when the top expanded and shrunk with seasonal changes in humidity. I thought about just bringing the front leg up, but thought that might not solve the problem of pushing the top if the vice jaw was wider than the leg.
I ended up doing a stub tenon at the back edge of the front leg only. The tenon is the full width of the leg, about an inch wide front to back, and an inch and a half long. These two tenons (one at each end of the bench) fit into mortises I chopped (didn't drill these, just used my bevel-edged chisel as a mortise chisel) in the under side of the front of the top. I didn't glue this, just put the top down on the base with the mortises down over the tenons, and it seems to be solid enough. I haven't had any problems with the leg vise moving the top yet. I'm not sure how much sense this makes, so if you can't figure out what I'm saying, yell.
Having a flat top as a reference surface is a useful thing, but I couldn't see spending all the time and effort neccesary to get the under side of the top completely flat. Since it only touches the base at the strips where it rests on the two leg assemblies, I ended up just planing a (relatively) flat path for each leg and leaving it at that. The top surface is pretty flat across its whole surface, but I didn't get out the feeler gages or anything. I also didn't bother taking it down enough to remove all the grooves between the individual boards. This is a working bench, and the hemlock and fir lumber I used is pretty soft, so I expect I'll have to resurface it occasionally. All those grooves will go away soon enough.
I haven't put any kind of finish on the bench yet, and I may not.
There are a few things I'd do differently if I had it to do again
Build it sooner!
I kind of screwed up making the tool tray. Somehow the sides of the tray ended up leaning in towards the center of the tray by a bit, so when the tray was glued on to the rest of the top it ended up not being straight across (from the front of the bench to the back), so I ended up having to do a bit more planing than I would have liked to get the surfaces of the top flat and parallel. If I'd noticed this before I glued it onto the front part of the top I could have planed that side square first and saved a lot of time later.
The vice I got (Record 52-1/2 ED) with its 9-inch-wide jaws and 13-inches of opening is major overkill. I could have gotten along with a much less major vice as my tail vice. You really just need enough opening to span between your dog holes, so the huge opening this is capable of doesn't add that much value. Plus, the width of the jaws forces where your dog holes can go, so if I'd used a narrower vice I could have gotten them closer to the front edge of the bench.
This page last updated 3/25/2005
TomeCat | Home |
Woodworking | Contact Webmaster